

What is... Optical Transfer Function?
AKA Modulation Transfer Function (kindof)

We don’t often think of how optically effective our lenses are when buying or renting them, we might assume they’re perfect. The efficiency of a lens is measured in a variety of ways and it’s easy to spiral into scientific babble when discussing such things! However, you can also measure the efficiency of a lens through emotional impact, instinct, or even ergonomics.
Today, though, we’re touching on the scientific babble and getting into thinking about how lenses achieve sharpness and what that really means.
If you take a moment to think about an image, perhaps the first image in this article, as you’re looking at it start to realise the only thing that’s making sense of the image is your physical distance to it. If you’re too far, even with 20/20 vision, there’ll come a point where you can’t make out what the image is. Similarly, when you’re too close you’ll possibly start to see the individual pixels on your screen working together to create the image for you - making it equally as difficult to make sense of the picture as if you were at a distance.

As you, I hope, were enthusiastically rushing around your room gaining distance from your screen to test this; your eyes were also working hard to maintain focus on that image - both near and far - potentially failing at the extreme ends to fully bring the image into focus with enough detail for you to understand what it is.
Well, lenses also suffer from this. Like eyes, no lens is perfect and one of the best ways to describe sharpness is by using the term ‘least blurry’. The Optical Transfer Function is a way to measure this optical fidelity.
Though it’s important to note that the Optical Transfer Function, and Modulation Transfer Function, does not simply relate to the measurement of the sharpness of a lens. It’s more accurate to say that the OTF/MTF measures a lens’ contrast, resolution, and resolving power across its’ field of view. But to keep things a little simpler, and focused, let’s continue down the path of ‘least blur’ because I think it’ll make most sense of why it’s important to be aware of the OTF/MTF of a lens.
So, like eyes, lenses have to sit at a specific distance to the imaging plane in order to achieve ‘least blur’. The image plane could be film, or a digital sensor, but each lens mounting system (the system that physically attaches a lens to a camera) has its own specific distance. This is called the Flange Focal Distance.
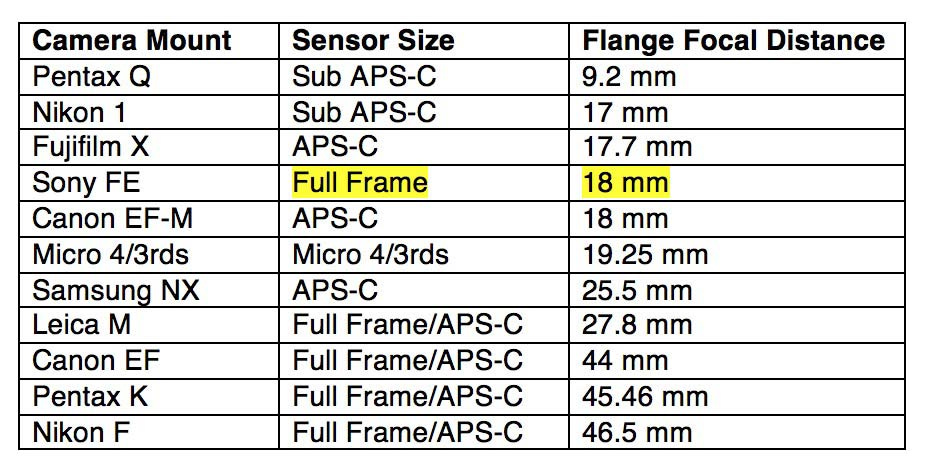
While those of us that are cinematographers may know that the FFD of a PL mount system is 52mm, the most common mounting system is actually called ‘C-Mount’ and has a FFD of 17.526mm… So it varies massively, meaning also that lenses from a C-Mount system would not focus properly on a PL system.
Now we’ve covered a little of that, let’s get more specific and start talking about lenses and how they achieve ‘least blur’. Take a wide angle lens versus a telephoto lens. The wide angle lens in this example is 18mm, and the telephoto is 270mm.

The image on the left is on the 270mm lens, and the image on the right is a cropped version of a photo taken with the 18mm lens. By keeping the car the same size, and cropping in on the wide angle photograph, you can see how the 18mm lens starts to break down optically. For reference, here is the cropped 18mm image next to the original uncropped photo:

Similar to the practical example at the beginning of this article, where we were running away from our screens, you can see that the lens here is incapable of capturing that level of detail from such a distance. Although the sensor is partially responsible for capturing that level of detail, the lens is doing most of the heavy lifting trying to generate an image of ‘least blur’.
While it might seem a little silly to shoot on such wide lenses and crop them like that, and you might think you’d never do such a thing, it’s important to know that our lenses do have physical limits. Those limits will change depending on what back-end system we are imaging for, such as large format sensors, large format film etc… - where lenses are built for specific systems. And you might think, well why not buy a large format optic and use it with my 35mm camera.
That large format lens is designed for use with a 8cm x 10cm image plane, a sheet of film, and as such the optical system is designed to project an image that can fill that 8x10 area. If you are shooting on 35mm (3.5cm), that’s significantly smaller than 8cm. So you are effectively cropping into that lenses optical ability, similar to the examples above.
In fact, in last week’s article (DIY Medium Format Anamorphic), there was a link I provided to a short film I did with that lens. The short film was shot on a micro 4/3rd camera, when the lens was designed for use with a medium format (6x6) photographic camera. Using it on the M4/3 system then meant that the lens provided much more halation - as I was cropping into the lens’ ability to provide ‘least blur’.
Although the Optical Transfer Function does look at more than simply the lens’ ability to maintain detail & focus, it’s one of the key functions of that process during testing.
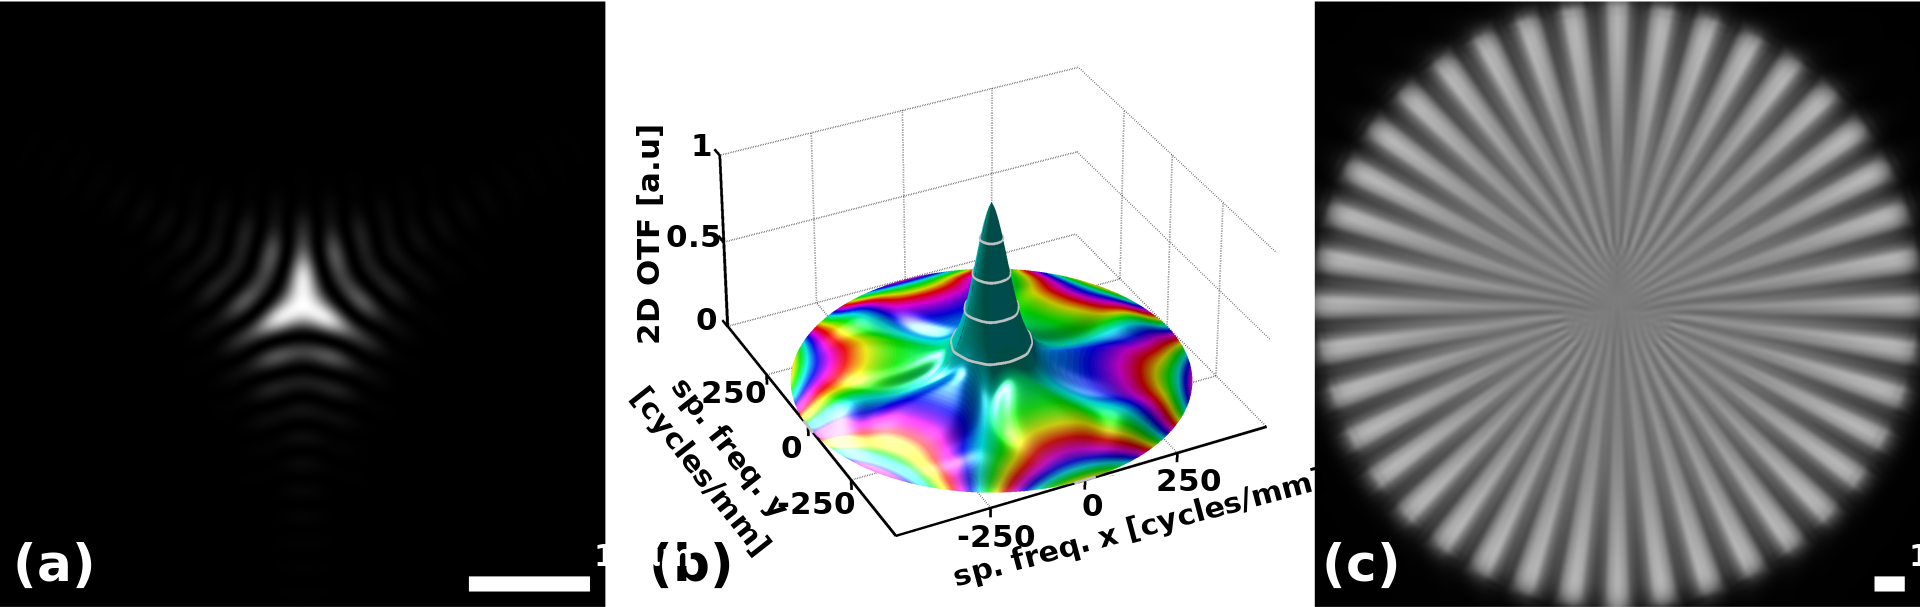
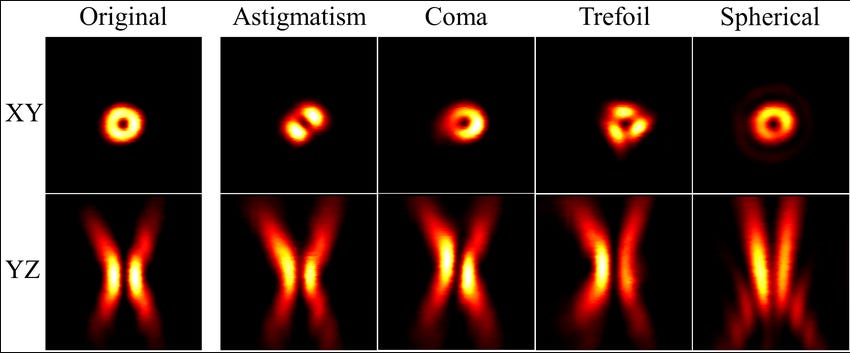
Other important elements that the OTF explains are optical aberrations. In image (a) above, the lens has a trefoil aberration. In image (b) you can see the 3D representation of the data from testing with the Siemens star, and on the star (c) you may be able to make out the same pattern as shown on image (a) if you look close enough (don’t strain your eyes this time though…)
It’s important that we go back to the opening paragraph of this article, and remember that lenses are not always best when optically perfect. The lens you love most may be the one that technically performs the worst, so don’t let the Optical Transfer Function dissuade your creative expression.
As we see the pixel pitch of modern sensors continue to shrink, the lens’ resolving power does become ever more important. Although we don’t want to be limited creatively, it’s a good idea to be aware of how our lenses are functioning as optical mechanisms - and also how we might use those imperfections for creative gain.